Lovable to Elementor in 5 Minutes
I’ve been working with AI web builders and WordPress for over a decade, and I’ll admit—when I first tried Lovable.dev, I was blown away . You can literally prompt an AI to build a stunning, fully responsive website in minutes. But here’s the problem I kept running into: my clients still want WordPress.
And honestly, I get it. WordPress powers 43% of the web for a reason. It’s familiar, it’s flexible, and clients can manage their own content without calling me every time they want to change a heading.
So for months, I found myself in this frustrating loop: build something beautiful in Lovable in 10 minutes, then spend 5+ hours manually recreating it in Elementor, widget by widget, trying to match spacing and colors pixel-by-pixel. That’s $500+ in billable hours per project, completely wasted on manual labor. Until I discovered ClonewebX .
Quick Navigation
- The Bridge Between AI Speed and WordPress Flexibility
- What You’ll Need Before Starting
- Step-by-Step: Converting Lovable to Elementor
- Why This Beats Every Other Method
- ClonewebX Pricing: Which Plan Makes Sense?
- The Business Case for Your Agency
- Real-World Use Cases From My Agency
- Frequently Asked Questions
The Bridge Between AI Speed and WordPress Flexibility
ClonewebX is a Chrome extension that essentially lets you “copy-paste” web designs directly into Elementor. It captures the HTML and CSS structure from any live webpage—including your Lovable.dev projects—and converts it into native Elementor containers and widgets.
I’ve tested it on dozens of client projects now, and while it’s not magic (more on that in a moment), it’s genuinely cut my workflow time by about 80%. That’s 4 extra hours I can bill elsewhere, or 4 extra projects I can take on per week.
If you’re an agency owner or freelancer, that math should get your attention. Let’s break down exactly how this works—and more importantly, how it can transform your bottom line.
What You’ll Need Before Starting
Before we dive into the tutorial, make sure you have:
- A published Lovable project with a live URL (e.g., yourproject.lovable.app)
- WordPress with Elementor installed (Free version works, but Pro gives you more widget options)
- The ClonewebX Chrome Extension (I’ll break down the pricing options below—there’s even a free tier to test it out)
Critical setup note: Go to Elementor → Settings → Features and make sure “Flexbox Container” is enabled. This is non-negotiable for modern cloning—without it, your layouts will break.
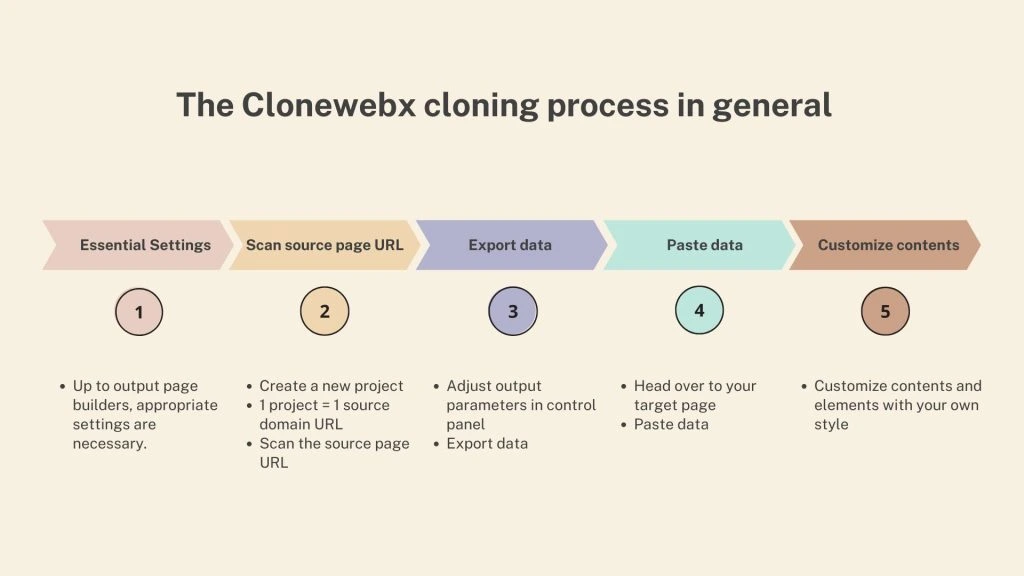
Step-by-Step: Converting Lovable to Elementor
Step 1: Export Your Lovable Design
First, publish your Lovable project to get a live URL. In my experience, you can’t clone directly from the Lovable editor—it needs to be the actual published site.
Once it’s live:
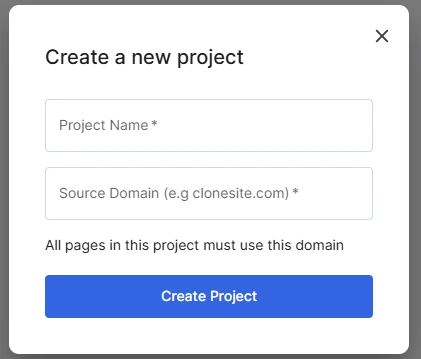
- Open your Lovable project URL in Chrome
- Click the ClonewebX extension icon
- Select “Elementor” as your target platform
Here’s a pro tip I learned the hard way: Don’t try to clone the entire page at once. Instead, click on individual sections (header, hero, features, footer) and clone them one at a time. This gives you way more control and reduces the chance of DOM structure conflicts.
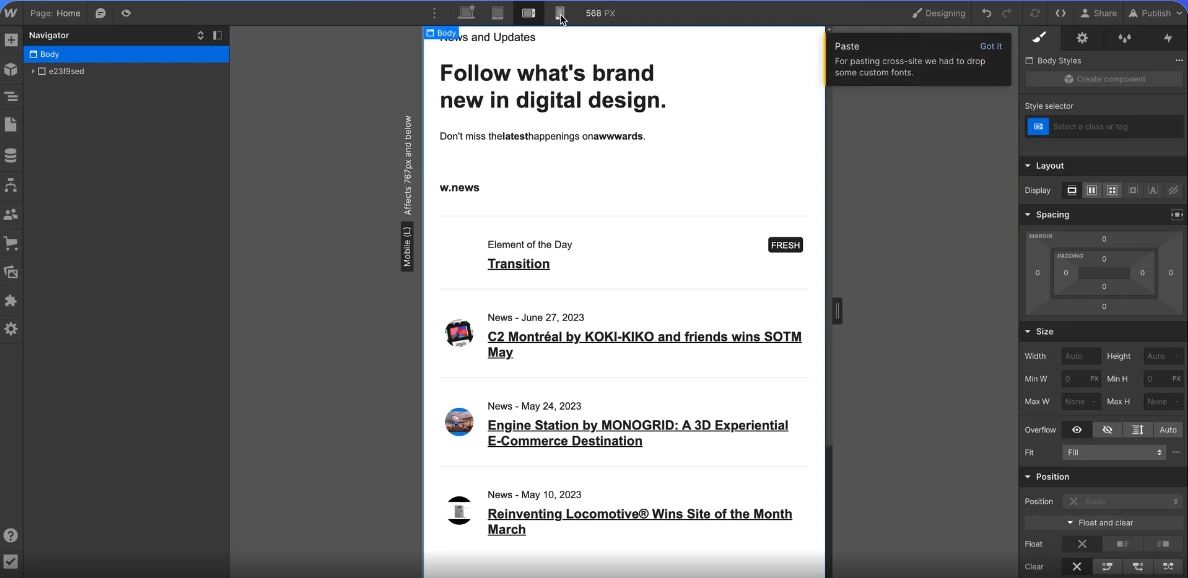
Step 2: Import Into Elementor
Now switch over to your WordPress site:
- Open the page you want to edit in Elementor
- Right-click anywhere on the canvas
- Select “Paste from other site” (this appears when ClonewebX is active)
Within seconds, you’ll see the layout materialize. The first time I saw this work, I actually said “no way” out loud. It imports the containers, spacing, colors, typography—the whole visual structure. This is the moment that saves you 4-5 hours of tedious work. And if you’re charging $75-150/hour (which you should be), that’s real money back in your pocket.
Step 3: The Cleanup Phase (This Is Where Experience Matters)
Here’s where I need to set realistic expectations. The import won’t be 100% perfect, and that’s okay. Here’s what I always check immediately:
Responsive Behavior: Switch to tablet and mobile views right away. Lovable designs are responsive, but sometimes padding and margins don’t translate perfectly. I typically need to adjust container widths (change from fixed pixels to percentage), font sizes (Elementor’s responsive controls make this easy), and spacing between elements on mobile.
Dynamic Elements and Interactions: Lovable builds with React, which means interactive elements (forms, sliders, modals) will import as static HTML/CSS. You’ll need to replace these with actual Elementor widgets: swap static forms for Elementor Form widgets (captures leads properly), replace animated counters with the Counter widget, and rebuild sliders using the Carousel widget. This usually takes me 15-20 minutes, but it’s still infinitely faster than rebuilding from scratch.
Images and Media: Images often come through as external links or placeholders. I always download the images from the Lovable project, upload them to WordPress Media Library, and replace the links with proper WordPress attachments. This is important for SEO, load times, and making sure your images don’t break if Lovable changes their hosting. Plus, clients notice when images load slowly—it undermines the premium feel you’re trying to create.
Custom Fonts and Icons: If your Lovable design uses Google Fonts, you might need to reconnect them in Elementor’s settings. Icon libraries usually come through fine, but double-check.
Why This Beats Every Other Method I’ve Tried
I’ve explored every workflow for getting AI designs into WordPress:
- Manual Recreation: Tedious and time-consuming. You’re literally competing with your own hourly rate at that point.
- HTML to WordPress Conversion: Requires serious PHP knowledge and custom theme development. Great if you’re a developer, but overkill for most projects.
- Exporting Code from Lovable: Possible with tools like Cursor, but you’re essentially building a custom WordPress theme from React code. Way too complex for agencies that just need a client-manageable website.
- Page Builder Imports (JSON): Some builders let you import JSON, but they’re platform-specific and don’t work with Lovable’s output.
ClonewebX sits in the sweet spot: technical enough to work reliably, but simple enough that my junior designers can use it without coding knowledge. Which means you’re not the bottleneck anymore.
For more insights on optimizing your project management workflow while handling multiple client projects, check out my detailed ClickUp review for 2025—it’s been a game-changer for keeping track of all these conversions.
ClonewebX Pricing: Which Plan Makes Sense?
Let me be straight with you about the investment because I hate when reviews hide the pricing until the end .
| Plan | Price | Sites/Period | Best For |
|---|---|---|---|
| Free Plan | $0/month | 2 sites, 10 exports/month | Testing only (Gutenberg/Webflow only, not responsive) |
| 30 Sites | $10/month | 30 sites/month, unlimited pages | Solo freelancers (1-5 projects/month) |
| 400 Sites | $120/year | 400 sites/year, unlimited pages | Active freelancers (5-15 projects/month) |
| Black Friday Deal | $210 lifetime (was $300) | 300 sites/year FOR LIFETIME | Agencies and power users (grab immediately if available) |
All paid plans include: all output builders (including Elementor), fully responsive cloning, premium support, and a 30-day refund guarantee .
???? Start Saving 20+ Hours Per Month
The $10/month plan pays for itself if you save just 8 minutes on a single project. Everything after that is pure profit. Get started with ClonewebX today and transform your workflow.
Get ClonewebX Now →The Business Case: Why This Matters for Your Agency
Let me put this in concrete terms because I’m guessing you care more about revenue than technical specs.
Old workflow (manual rebuild):
- Lovable design: 30 minutes
- Manual Elementor recreation: 5-6 hours
- Client revisions: 1-2 hours
- Total: 6.5-8.5 hours per landing page
New workflow (with ClonewebX):
- Lovable design: 30 minutes
- ClonewebX conversion: 5 minutes
- Elementor cleanup: 30-45 minutes
- Client revisions: 30 minutes (faster because base is solid)
- Total: 1.5-2 hours per landing page
That’s a 75-80% time reduction.
Now let’s talk ROI on the ClonewebX investment:
If you’re on the $10/month plan:
- Cost: $120/year
- Time saved per project: ~5 hours
- Your hourly rate: $75 (conservative estimate)
- Value saved per project: $375
- Break-even point: 1 project every 3 months
You’d need to do just 4 landing pages per year for this to pay for itself. If you’re doing fewer than that, you’re probably not the target market for this workflow anyway.
If you grab the lifetime Black Friday deal at $210:
- One-time cost: $210
- First project saves you: $375 in billable time
- You’re profitable after your first project
- Every project after that is pure savings
And here’s the real kicker: what could you do with an extra 20-40 hours per month? If you’re billing $100/hour, that’s $2,000-4,000 in additional monthly revenue you could capture by taking on 2-3 more clients, offering faster turnaround times (and charging a premium for it), finally launching that passive income product you’ve been planning, or spending less time working and more time with your family.
Real-World Use Cases From My Agency
I primarily use this workflow for:
Landing Pages for Startups: I can now offer “AI-powered design + WordPress delivery” as a package. Clients love seeing options fast, and I’m not eating my margins to provide speed. I’m currently charging $1,500 for landing pages that take me 2 hours of actual work.
Client Pitch Mockups: Build a working prototype in Lovable, show it in the pitch meeting, then convert it to their existing WordPress site if they sign. No wasted work if they don’t. My close rate went from 40% to 65% after implementing this.
Template Libraries for Recurring Revenue: I’ve built a library of high-converting sections in Lovable (hero blocks, pricing tables, testimonials). Now I can clone and customize them for clients in minutes. This has been huge for my retainer business—I can serve 3x more retainer clients with the same time investment.
White-Label Solutions for Other Agencies: Some agencies I work with don’t have AI/Lovable expertise. I design in Lovable, convert to Elementor, and deliver as a finished WordPress site. They mark it up 50-100%, everyone wins. This alone brings in an extra $3,000-5,000/month.
The biggest psychological win? I can now involve clients in the design process earlier. We iterate in Lovable with AI prompts until they love it, then I convert it. No more “can you move that button 5 pixels to the left?” emails, because they’ve already approved the design before I even touch WordPress. This has cut my revision cycles from 3-4 rounds down to 1-2, saving another 2-3 hours per project.
Frequently Asked Questions
Does this work with Elementor Free or do I need Pro?
It works with both, but Elementor Pro gives you access to more widgets (Forms, Sliders, Post widgets). If your Lovable design uses complex components, you’ll want Pro for the replacements. Pro pays for itself in one project with this workflow.
Can I clone password-protected Lovable projects?
As long as you can view it in your browser, ClonewebX can clone it. Just make sure you’re logged in to Lovable first.
What about animations and scroll effects?
Basic CSS animations usually transfer. Advanced JavaScript interactions won’t. You’ll need to rebuild those using Elementor’s Motion Effects or a plugin like Lottie. But honestly, most client projects don’t need complex animations—they need sites that convert.
Will this slow down my WordPress site?
Not if you clean up the code properly . I always run the imported page through Elementor’s “Regenerate CSS” option and optimize images. The resulting page performs just like any other Elementor page—often better, because Lovable generates clean code.
How do the site limits work?
Each “site” is one domain you clone to. So if you’re cloning 5 Lovable projects to the same WordPress site, that only counts as 1 site. The “unlimited pages” means you can clone as many individual pages as you want from each project.
What if I hit my monthly limit?
You can upgrade mid-month and the limits reset immediately. Or just wait until next month—the sites you’ve already cloned continue to work fine.
Is there a learning curve?
Minimal. If you already know Elementor and understand basic responsive design, you’ll be productive within an hour. I had my team up and running in a single training session.
What if the import breaks or looks wrong?
Clone smaller sections instead of the full page. Use your browser’s Inspect tool to identify which specific container is causing issues. Sometimes you need to manually adjust flex direction or width constraints. After your first 2-3 projects, you’ll develop an intuition for what needs adjustment.
Can I cancel anytime?
Yes. Monthly plans cancel anytime. Annual plans are paid upfront but come with a 30-day refund guarantee. The lifetime deal is one-time payment with the same 30-day guarantee—after that, it’s yours forever.
The Bottom Line: This Is Your Competitive Edge
After 15+ years in this industry, I can confidently say this workflow represents a genuine shift in how agencies can operate. We’re no longer choosing between AI speed and client-friendly platforms—we can have both.
And here’s the thing about competitive advantages: they don’t last forever. Right now, most agencies are still manually rebuilding AI designs or avoiding AI tools altogether because there’s no clear path to WordPress. That gives you a 6-12 month window to establish yourself as the “fast, affordable, high-quality” option in your market.
My typical timeline now:
- Lovable design: 15-30 minutes
- ClonewebX conversion: 5 minutes
- Elementor cleanup: 20-30 minutes
- Total: ~1 hour (vs. 5-6 hours before)
The tool isn’t perfect—you’ll still need WordPress and Elementor knowledge to finish the job properly. But for anyone who’s been waiting for a practical bridge between AI design tools and WordPress, this is it .
Ready to Transform Your Workflow?
Here’s exactly what I want you to do right now:
Step 1: Decide which plan makes sense for your volume. Occasional freelancer (1-5 projects/month): Start with the $10/month plan. Active freelancer or small agency (5-15 projects/month): Go annual at $120/year. Growing agency or serious about scale (15+ projects/month): Grab the lifetime deal if available.
Step 2: Get ClonewebX here and install the Chrome extension (takes 30 seconds)
Step 3: Create a simple test project in Lovable – Just a basic hero section and a features grid. Nothing fancy.
Step 4: Clone it into a test WordPress page – See the process for yourself. Time it. You’ll be shocked.
Step 5: Calculate your ROI – Multiply your time savings by your hourly rate and your monthly project volume. That’s money you’re leaving on the table right now.
⏰ Start Saving 4-5 Hours Per Project Today
The math is simple: Investment of $10-210 (depending on plan), time saved per project of 4-5 hours, value of saved time of $300-750 per project. You break even on your first project. Every project after that is pure profit.
Click Here to Get ClonewebX and Start Saving 20+ Hours Per Month →One more thing: If you’re still on the fence, ask yourself this: What’s the cost of NOT implementing this? Every month you stick with manual rebuilds is another month of lost revenue, burned hours, and missed opportunities. Your competitors are finding these tools. The agencies that adapt fastest will dominate the next 2-3 years.
If you’re doing 10 landing pages per month at 5 hours each, that’s 50 hours of manual work. With this workflow, that becomes 10 hours. That’s 40 hours back in your business every single month. What would you do with an extra 40 hours? That’s the real question.
Don’t be the agency that gets left behind because you hesitated on a $10/month tool that could literally transform your business model.

About Alex Carter
AI tools expert with over 10 years of experience testing and reviewing technology products.